Introduction
All features of MultiTool are documented here. Feel free to join Discord if you have any questions or feature requests. You can also Email us at Perfect_StormTD( @ ) hotmail.com.
Installation
After you’ve downloaded MultiTool from the UE4 marketplace, you’ll need to add it to your project. Once that is done, the plugin will be available for you in the plugin folder. Simply launch the editor and go to Edit –> Plugins.
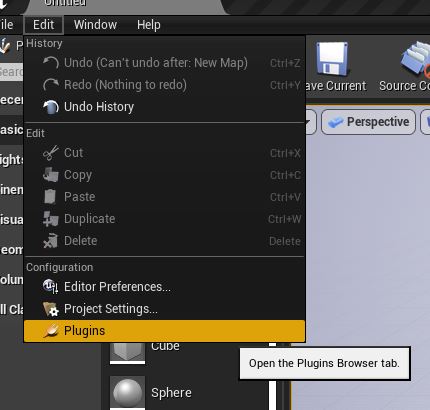
Once the plugin menu has opened, you can look for the plugin in the left menu. You can either search for PS Studios or MultiTool, or look under the menu Installed. Once you found it, click on the checkbox Enabled.
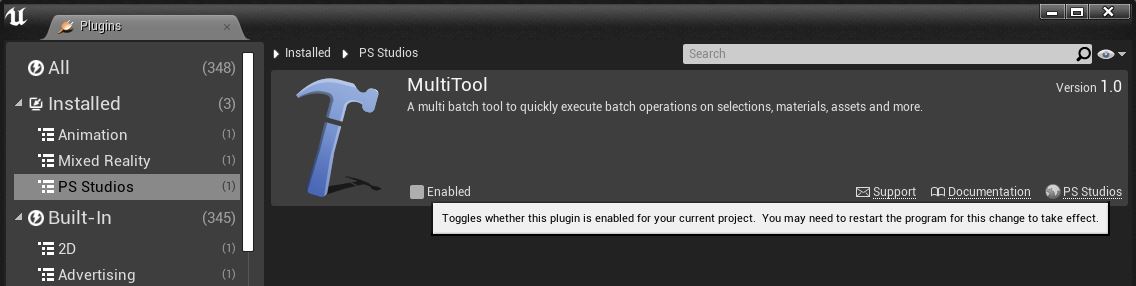
After enabling it, make sure to restart the editor by clicking the Restart Now button.
The next time you launch the editor, you should see the MultiTool icon in the top bar of the editor.

Features
Overview
Below you can find an overview of all the features of MultiTool, and an in-depth explanation of how they work.
Loading and Saving

All settings of MultiTool can be saved and loaded (Unreal Version 4.26+). Saving works through the default saving system of Unreal. Saved settings are stored in your project under …/Content/Saved/SaveGames/MultiToolSaveData.sav
These data files can be shared among other projects to use the same settings.
If you want to load the saved settings, then all you have to do is click on the Load Settings button on the top right of your screen. After that, you’ll need to confirm loading the saved settings. This will override all the settings you currently have.
Saving goes through a similar process, but instead the user needs to click on Save Settings. Another confirmation window will pop up. Be careful that any existing SaveData file will be overwritten! It’s currently not supported to save multiple different presets of settings, however you can backup any existing SaveData and swap them out as you please. You don’t need to close the editor for this.
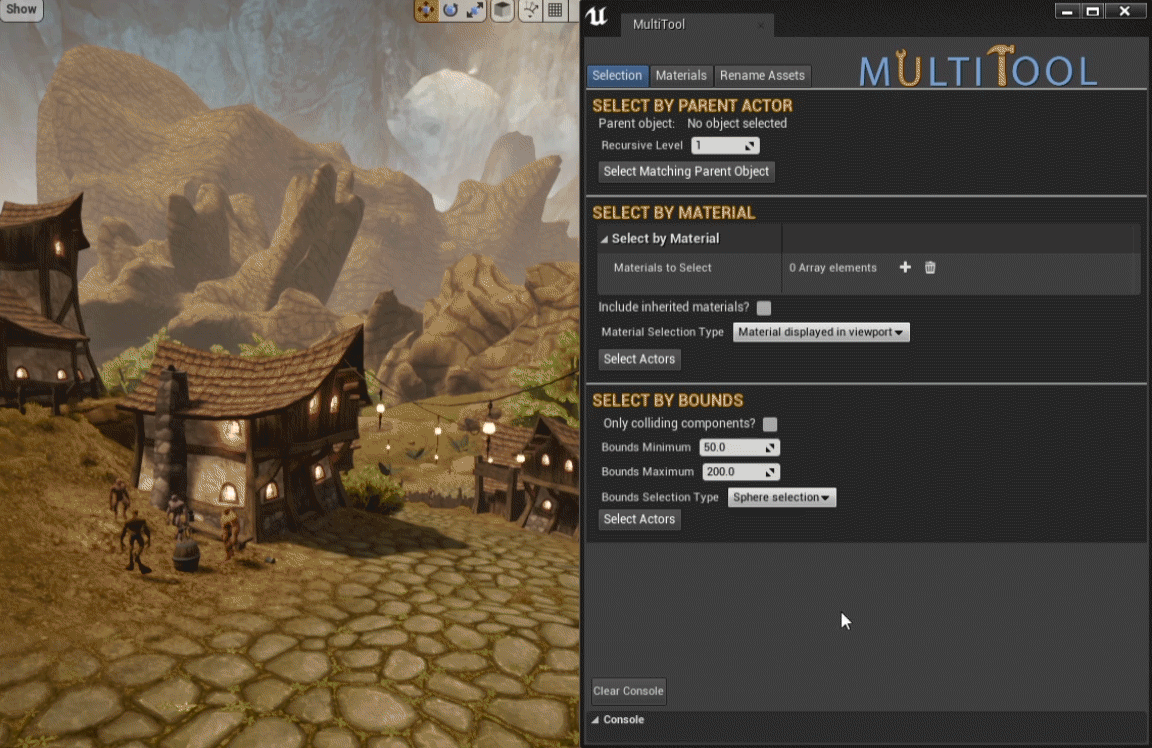
Selection
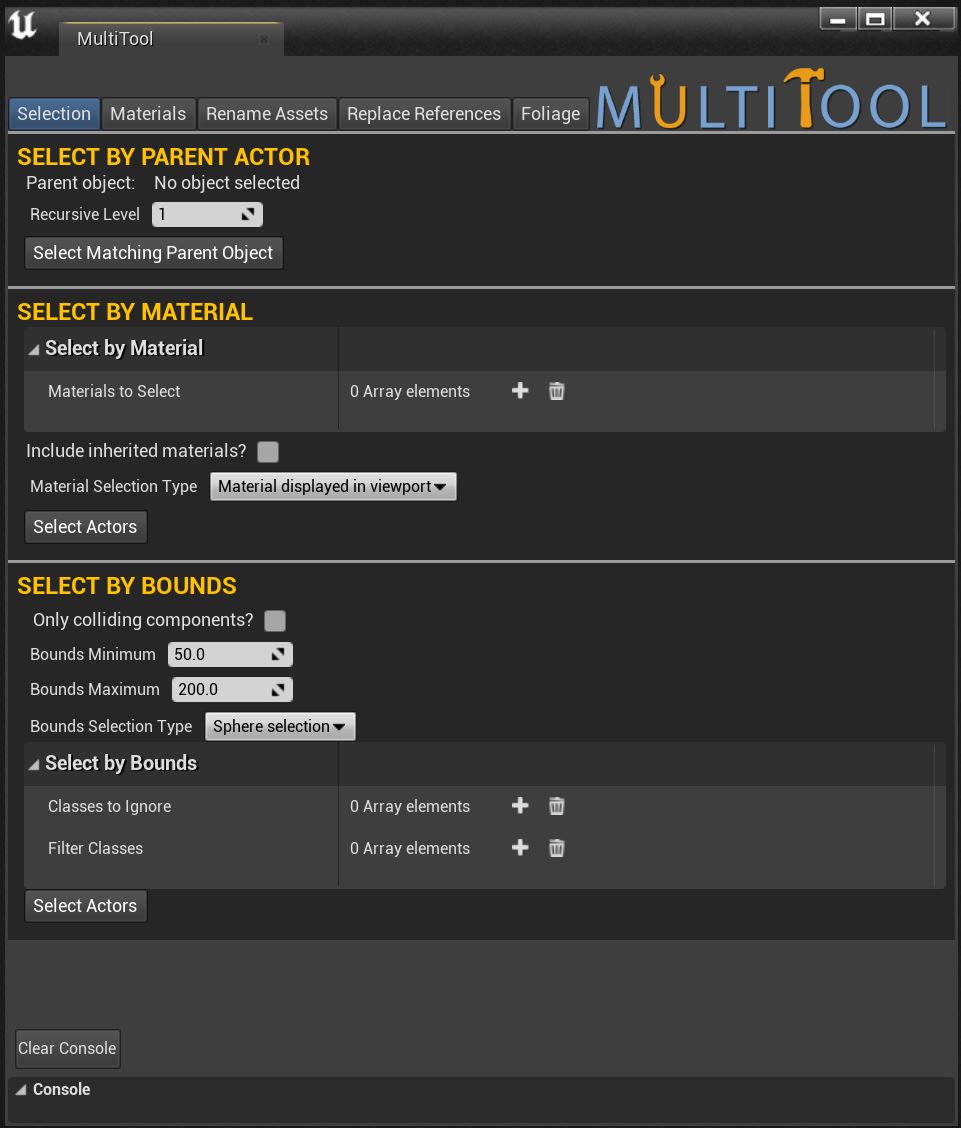
Select by parent actor
Blueprints are often derived from parents. The Select by parent actor option allows you to select objects that match the currently selected object(s) parent class. For example, you have all characters derived from NPC_Master. The class inheritance structure of your character look like this:
Object –> Actor –> Pawn –> Character –> NPC_Master –> Current Selected Object
If you select a character in the viewport, the Parent Object will be printed in the MultiTool window. You can choose the Recursive level as well.
- Recursive level 1 -> NPC_Master
- Recursive level 2 -> Character
- Recursive level 3 -> Pawn
- Etc…
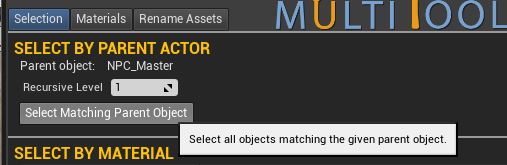
If you hit the Select Matching Parent Object button, then MultiTool will return all actors in the level that share the same parent object, anywhere in their inheritance structure.
Select By Material
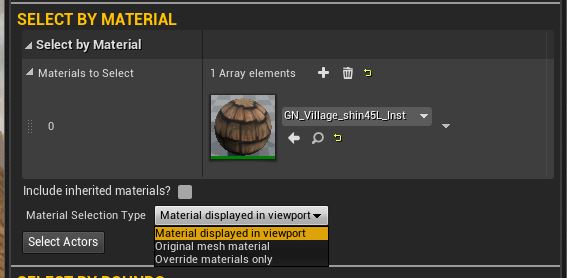
Select by Material allows users to select actors based on their material. It has the following options:
- Materials to Select
- A list of materials that an actor can have in order to get selected.
- Multiple materials means that if an object matches 1 of the materials, it will get selected.
- Include inherited materials?
- Should we also select actors that share the same master material?
- This is a little bit of a slower process, as MultiTool first needs to fetch all master materials before it goes to the selection process.
- Material selection type
- Materials displayed in viewport
- Select based on the visible material in the viewport. If an actor contains an override material, then it will use this material to compare with.
- Original mesh material
- Use the original .uasset mesh to compare materials, and select based on that.
- This option means that override materials are ignored completely.
- Override materials only
- Only match override materials, ignore original .uasset materials, even if there are no override materials set.
- Materials displayed in viewport
- Select Actors
- Hit this button to start the selection process.
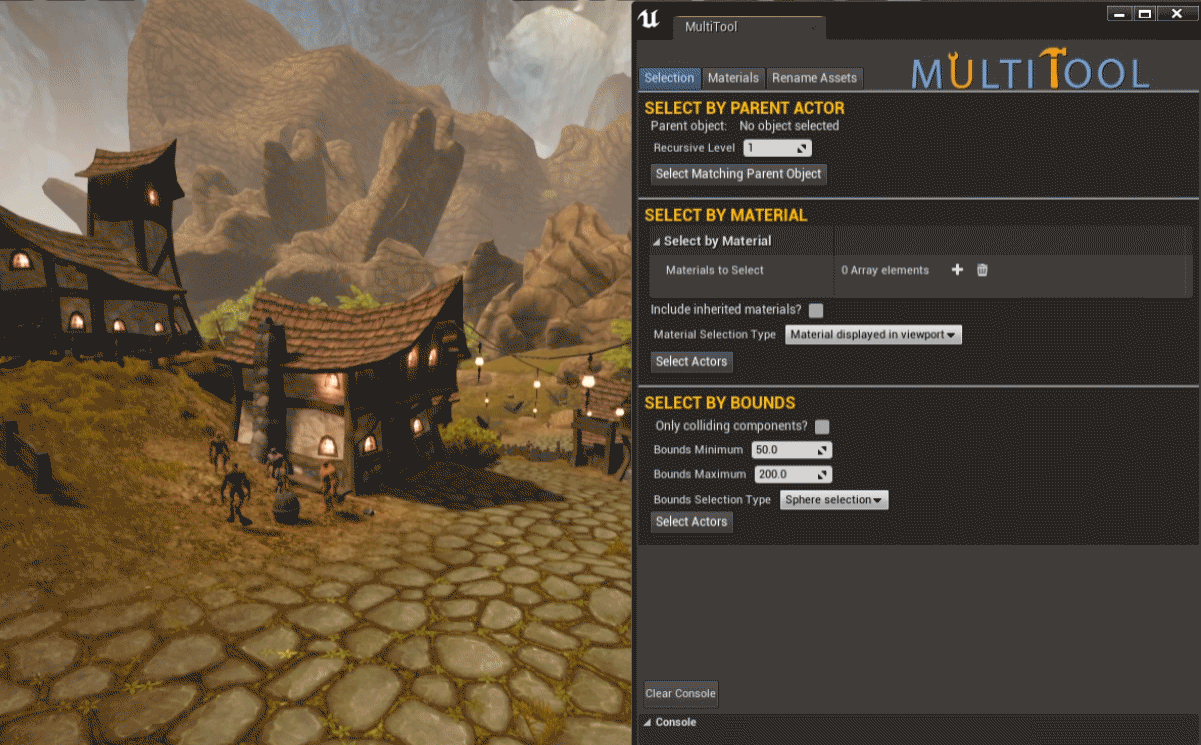
Select By Bounds
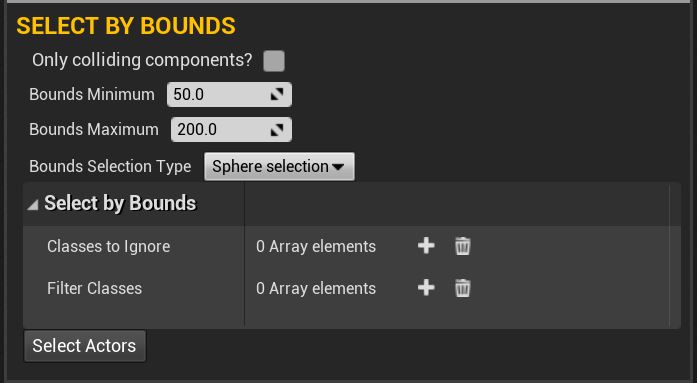
This selection method allows users to select objects based on their bounds (size in world). Users can set the following options:
- Only colliding components?
- Check this box to only use colliding components for the bounds calculations. Objects that have no collision will return bounds of 0.
- Bounds Minimum
- The minimum bounds range
- Bounds Maxiumum
- The maximum bounds range
- Bounds Selection Type
- The type of bounds selection. These could be:
- Sphere selection
- Bounds will be calculated from a simple sphere.
- Vector selection
- Bounds will be calculated from a box. This means that it has 3 axis: X, Y and Z, that can independently have different sizes.
- Sphere selection
- The type of bounds selection. These could be:
- Classes to ignore
- Classes that will not be selected by the SelectByBounds. Leave empty to not use any classes to ignore.
- Filter Classes
- List of classes that will be selected by the SelectByBounds function. Leave empty to not use Filter Classes.
Materials
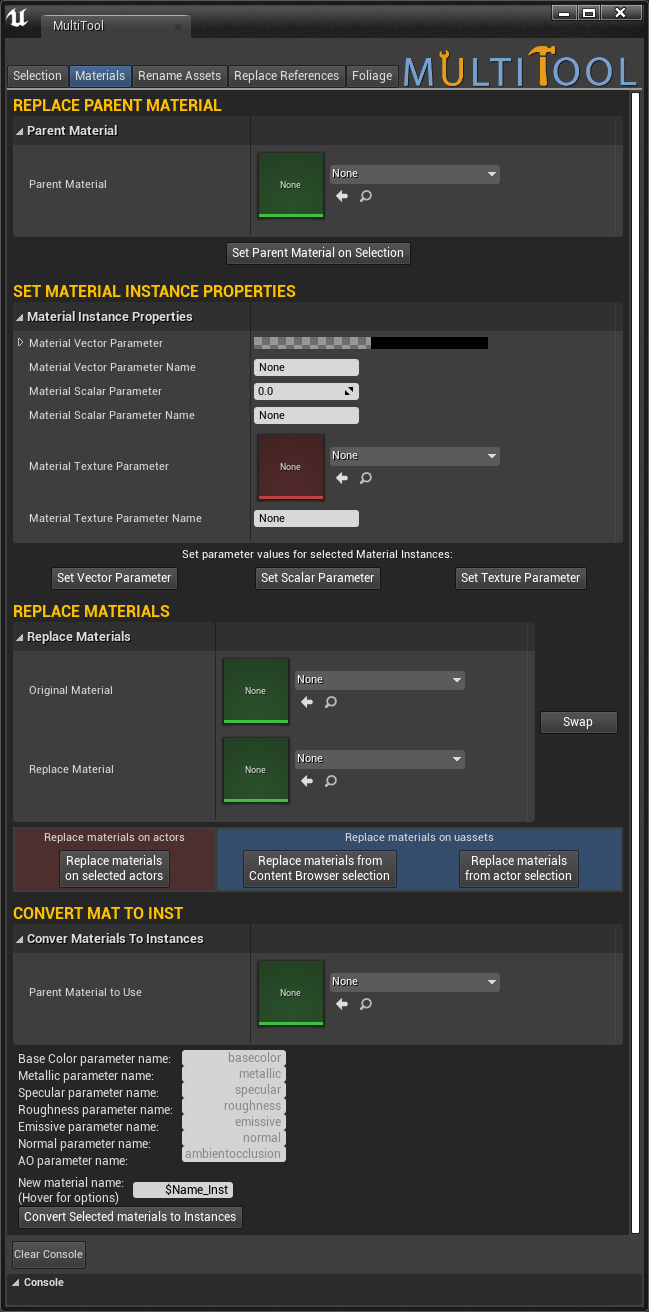
Replace Parent Material
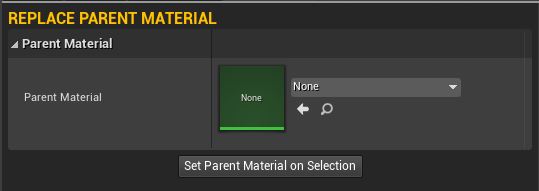
Users can quickly batch replace parent materials of selected Material Instance Constant assets. In order to do that, simply select the parent material you wish to assign to the Material Instance Constant assets, and assign it to the Parent Material slot.
Select the assets you want to change in the content browers, and hit Set Parent Material on Selection.
Options to set:
- Parent Material
- The parent material to use as a new parent material for the selected assets.
- Set Parent Material on Selection
- Hit this button to set the parent material on the currently selected assets.
Set Material Instance Properties

Allows users to batch change material instance properties. The available options are these:
- Material Vector Parameter Names
- List of Material Vector parameters to change. Each entree has its own properties.
- Material Vector Override
- This checkbox will determine whether to overwrite the parameter or not. If unchecked, the value will revert to it’s parent and the filled in value will be lost.
- Material Vector Parameter
- The Vector Parameter value to set for the specified Vector Parameter Name
- Material Vector Parameter Names
- The names of the Vector Parameter to change. If the selected asset does not contain a name filled in here, it will skip this name and not change the vector parameter value for this name. It will still try to change the other names filled in.
- Material Vector Override
- List of Material Vector parameters to change. Each entree has its own properties.
- Material Scalar Parameter Names
- List of Material Scalar Parameters to change. Each entree has its own properties.
- Material Scalar Override
- This checkbox will determine whether to overwrite the parameter or not. If unchecked, the value will revert to it’s parent and the filled in value will be lost.
- Material Scalar Parameter
- The Scalar Parameter value to set for the specified Scalar Parameter Name
- Material Scalar Parameter Names
- The names of the Scalar Parameter to change. If the selected asset does not contain a name filled in here, it will skip this name and not change the scalar parameter value for this name. It will still try to change the other names filled in.
- Material Scalar Override
- List of Material Scalar Parameters to change. Each entree has its own properties.
- Material Texture Parameter Names
- List of Material Texture Parameters to change. Each entree has its own properties.
- Material Texture Override
- This checkbox will determine whether to overwrite the parameter or not. If unchecked, the value will revert to it’s parent and the filled in value will be lost.
- Find Texture by Name
- If true, the system will automatically try to find the correct texture based on the field below.
- Texture Name
- The texture that needs to be found on disk. It can use the material instance name as a base with the name $Name, and with wildcards you can remove or add parts to the search string. Wildcards are:
- [-x]$Name
- Remove x characters from the start of the Material name. For example: [-4]$Name removes the first 4 characters.
- $Name[-x]
- Remove x characters from the end of the Material name. For example: $Name[-4] removes the last 4 characters of the material name.
- [-x]$Name
- The texture that needs to be found on disk. It can use the material instance name as a base with the name $Name, and with wildcards you can remove or add parts to the search string. Wildcards are:
- Material Texture Parameter
- The Texture Parameter value to set for the specified Texture Parameter Name
- Material Texture Parameter Names
- The names of the Texture Parameter to change. If the selected asset does not contain a name filled in here, it will skip this name and not change the texture parameter value for this name. It will still try to change the other names filled in.
- Material Texture Override
- List of Material Texture Parameters to change. Each entree has its own properties.
- Set Vector Parameter
- Set the specified Vector Parameter Name to the specified Vector Parameter value
- Set Scalar Parameter
- Set the specified Scalar Parameter Name to the specified Scalar Parameter value
- Set Texture Parameter
- Set the specified Texture Parameter Name to the specified Texture Parameter value
Replace Materials
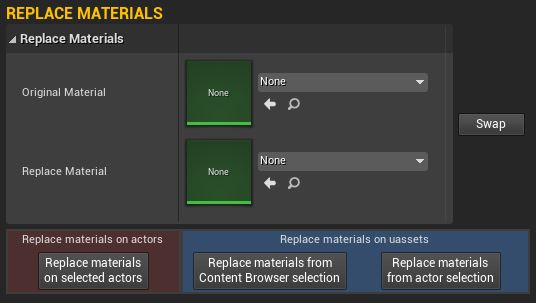
Replace materials of currently selected actors. Materials can be replaced on actors (Red menu), or .uassets (Blue menu). When replacing materials on uassets, users can select the assets in the viewport or in the content browser.
- Supports Undo
Parameters:
- Original Material
- The material to be replaced by the new material
- Replace Material
- The material to replace the original material with
- Swap
- Swap the original and replace material
- Replace materials on selected actors
- Replace the materials in-game. This means that it will find and replace materials for the selected in-game actors. Replaced materials will be set as override materials on the actor. If an actor already contained an override material, then it will replace the override material with the new material.
- Replace materials from content browser selection
- Replace materials on the selected .uassets. WARNING: This will replace the materials on the .uasset, so everywhere this actor is used in the project, this material will change!
- It will search and replace assets that are selected in the content browser.
- Replace materials from actor selection
- Same as above, but then it will search and replace assets that are selected in the viewport.
- It will search for primitive components, and try to extract the static or skeletal mesh from it. The materials on these meshes will be replaced.
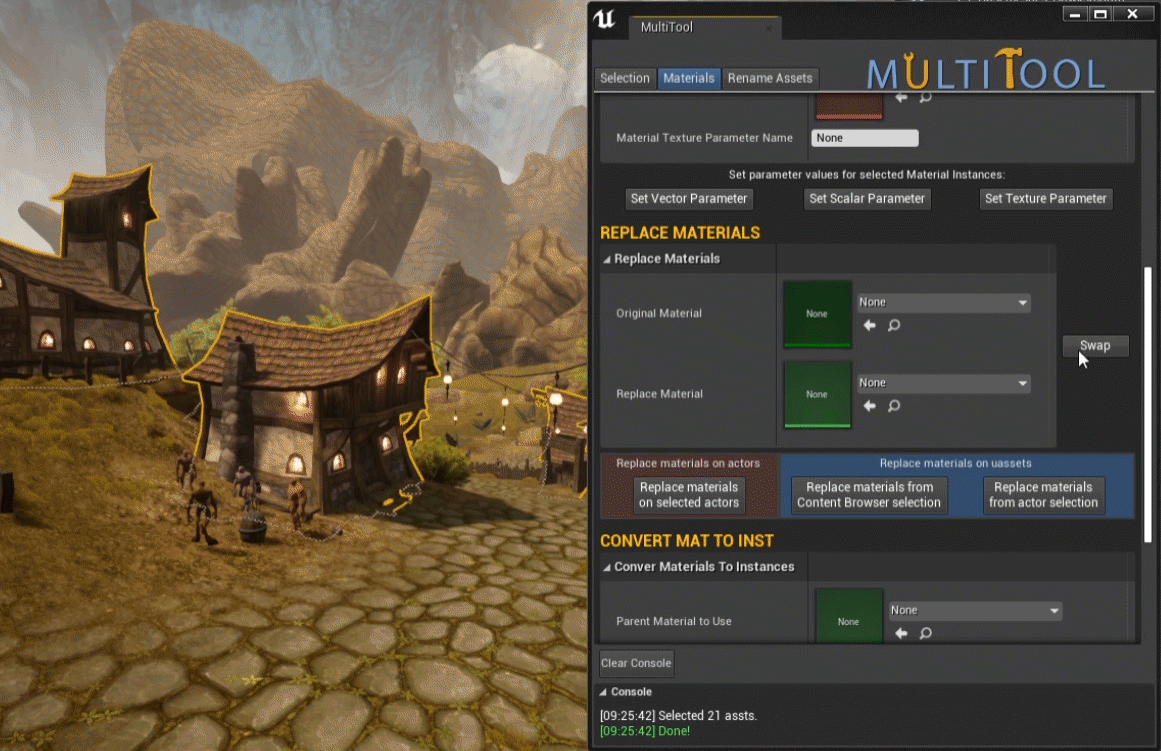
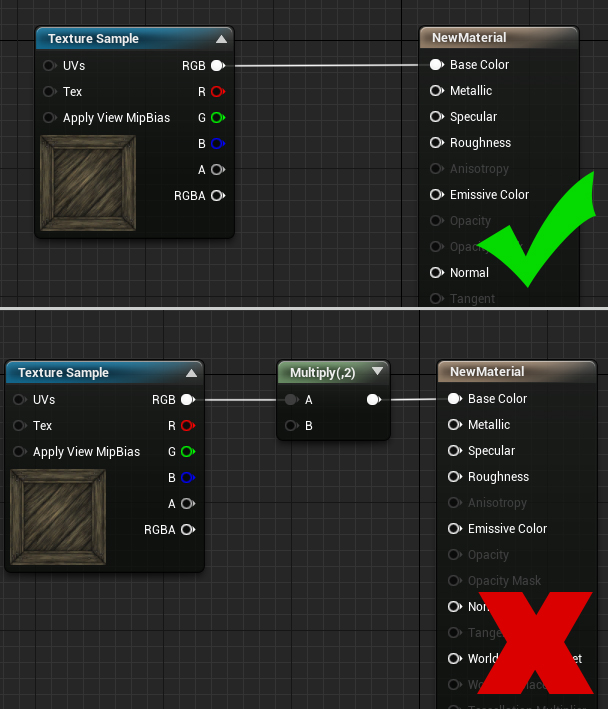
Convert Mat To Inst

This allows users to convert simple materials into Material Instance Constant assets. By default, Unreal creates materials for newly imported assets. But when batch importing lots of assets, these materials often contain the simple basics:
- A base Color texture
- A normal map
Altering lots of materials can be very time consuming, so it’s better to convert those materials to material instance constant assets, so you only have to maintain the master material.
Convert Mat to Inst has the following properties:
- Parent Material to Use
- The parent material to be used for the selected materials that need to be converted to material instance constants.
- Base Color parameter name
- The name of the base color parameter in the parent material
- This is where the base color texture will be applied to
- Metallic parameter name
- The name of the Metallic parameter in the parent material
- This is where the Metallic texture will be applied to
- Specular parameter name
- The name of the Specular parameter in the parent material
- This is where the Specular texture will be applied to
- Roughness parameter name
- The name of the Roughness parameter in the parent material
- This is where the Roughness texture will be applied to
- Emissive parameter name
- The name of the Emissive parameter in the parent material
- This is where the Emissive texture will be applied to
- Normal parameter name
- The name of the Normal parameter in the parent material
- This is where the Normal map texture will be applied to
- AO parameter name
- The name of the Ambient Occlusion parameter in the parent material
- This is where the Ambient Occlusion texture will be applied to
- New material name
- The material for the newly created asset.
- Use the $Name wildcard to use the original name
- Convert Selected materials to Instances
- Hit the button to start converting selected materials to material instances.
Limitations:
- Textures inside the material need to be directly linked to the input slot. Any nodes in between will break the ability to use that texture in the material instance.
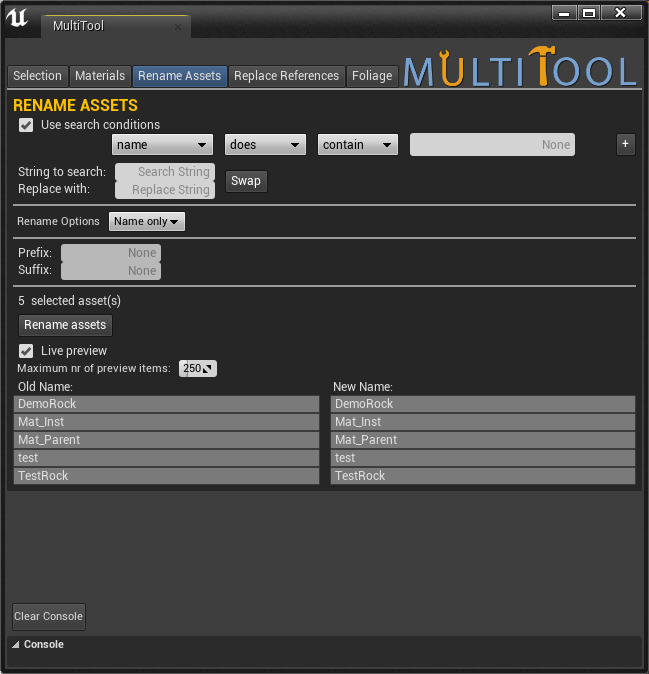
Rename Assets
Rename Assets
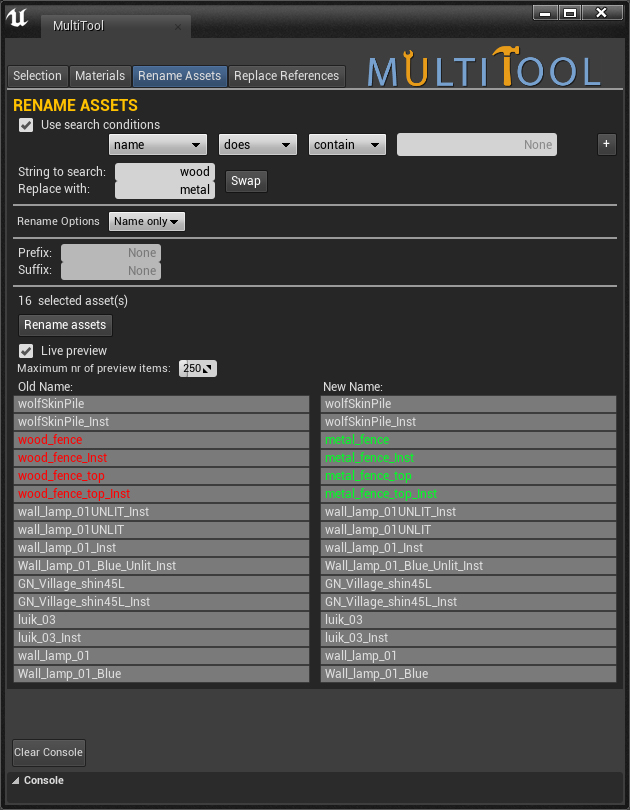
This is an advanced way of renaming assets by using filters.
Select assets in the content browser. You can also select paths in the path view of the content browser. If you want to use the path view selection, then make sure you have no individual assets selected in the content browser, or else MultiTool will use those as selected assets.
Properties:
- Use search conditions
- Only include assets that match the search conditions specified below. Turn this off to apply the rename on all selected assets.
- Search conditions:
- This can be used to search only for specific items. Parameters here are:
- Name / Path / Class Name
- Does / Does Not
- Contain / Start with / End with / Contain
- Input field
- Assets that match these conditions will be shown in the preview window below.
- This can be used to search only for specific items. Parameters here are:
- String to Search
- The string to replace
- Replace with
- The string to replace the search string with
- Swap
- Swap the String to search and Replace with string.
- Rename Options
- What part of the asset name should we include during renaming. Options are:
- Name only
- Only use the asset name for renaming, leave the path intact.
- Path only
- Only use the path for renaming, leave the asset name intact.
- Path and Name
- Use both the path and name for renaming.
- Name only
- What part of the asset name should we include during renaming. Options are:
- Prefix
- A prefix to set for the assets. This prefix will be set for all selected assets that match the search conditions!
- Suffix
- A suffix to set for the assets. This suffix will be set for all selected assets that match the search conditions!
- Selected asset count
- Displays the number of currently selected assets.
- Rename Assets
- Hit this button to start the renaming process
- Live preview
- Update the list of assets below every tick. When disabled, users need to hit enter first after they changed an input field before they see the list update.
- Maximum nr of review items
- The maximum number of items in the list to preview. Higher numbers in combination with live preview might stall your machine.
- Preview window
- Live update of what the renaming will do. Assets are color coded with:
- Grey – No name change
- Red – Old name
- Green – New name
- Live update of what the renaming will do. Assets are color coded with:
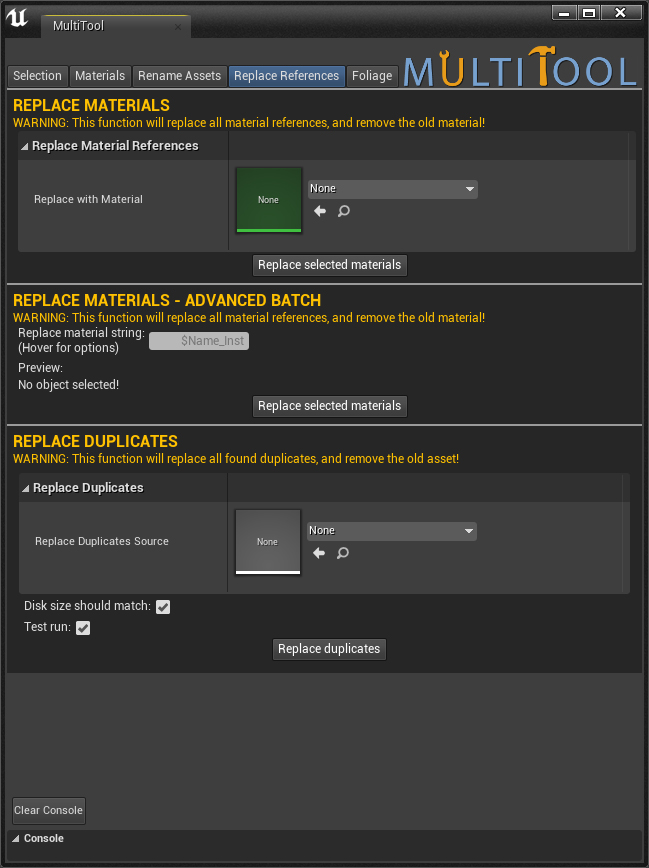
Replace References
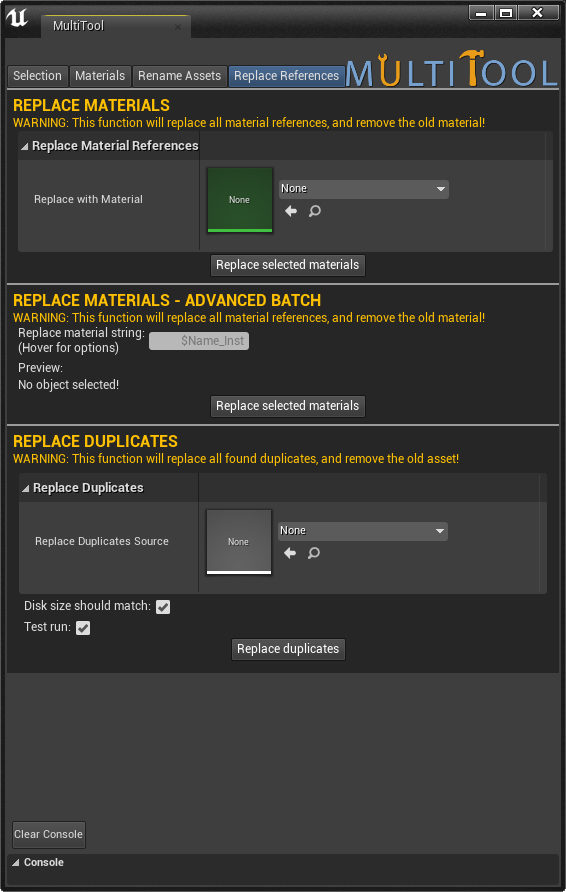
This tab is very similar to the replace reference function in Unreal, but it provides a couple of advantages. For example, it allows you to replace material references with material instances, something that isn’t possible in the stock version of Unreal. Another example is that it also has a batch feature, allowing users to replace multiple material references at once.
WARNING: Just like Unreal, replace references will DELETE the original reference after replacing it. It will keep a redirector in place that needs to be fixed up manually.
Replace Materials
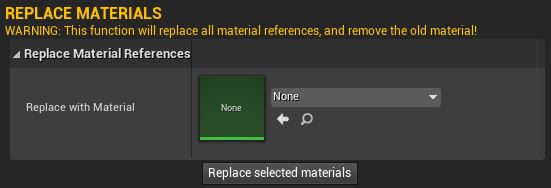
Allows users to replace the selected materials with a material interface of choice (Material or Material Instance)
The properties are:
- Replace with Material
- The material used to replace the references with
- Replace selected materials
- Button to click to start the replace reference process
Replace Materials – Advanced Batch
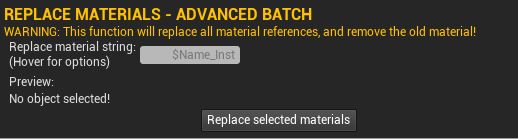
Similar to the function above, but this allows users to search for replacement materials based on the naming of assets.
For example, you have materials that have the following name pattern:
M_MaterialName_Mat
But you want to replace them with material instances that follow the following pattern:
MaterialName_Inst
This is exactly what the script could do, if you enter the following in the Replace material string field: [-2]$Name[-4]_Inst
- [-2] will remove the first 2 characters of the material name, in this case M_
- [-4] will remove the last 2 characters of the material name, in this case _Mat
- $Name will be replaced by the material name, in this case M_MaterialName_Mat, but since we removed the first 2 and last 4 characters, this will be MaterialName.
- _Inst will be added to the back as a suffix, making the new name to search for MaterialName_Inst.
The full list of properties to enter are:
- Replace material string
- The string to search for when searching for a replacement material
- $Name will be replaced by the asset name
- [-x] in front of $Name will remove the first x characters of the original asset name, see above for an example.
- [-x] behind $Name will remove the last x characters of the original asset name, see above for an example.
- Preview
- A quick preview of the new name to search for.
- When you have multiple objects selected, it will pick the first one in the selection only
- A quick preview of the new name to search for.
- Replace selected materials
- Start replacing references on selected assets
If an asset is not of the type Material Interface, or the new replacement material can’t be found, then this asset will be skipped.
Replace Duplicates
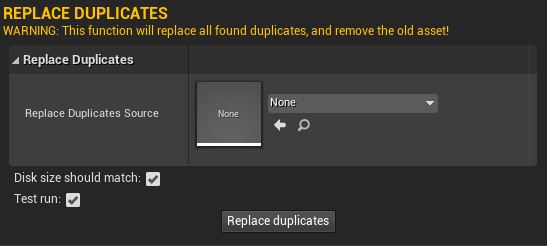
This allows users to find and replace all assets that share the same name and class and optionally also share the same size on disk.
- Replace Duplicates Source
- The object to search for. All duplicates will be replaced by this object.
- Disk size should match
- Only replace the object if the size on disk is identical.
- Please note that even though some objects are the same, their disk size could differ. Turn this off if the script complains that the disk sizes are different.
- Test run
- Do not replace the duplicates yet, but first log which objects are found.
- It’s advised to always do a test run first, as the script will remove the duplicates and there is no way back from this.
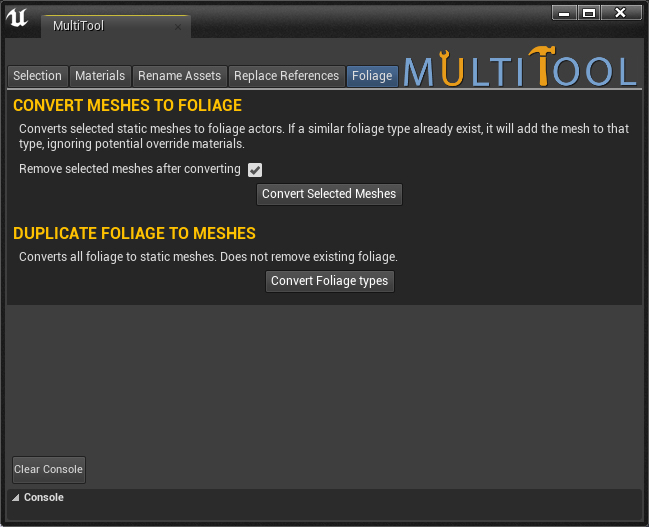
Foliage
Convert meshes to foliage
This will convert all selected meshes to foliage.
It has the following options:
- Remove selected meshes after converting
- Deletes the selected assets after converting the meshes to
- Convert Selected Meshes
- Press this button to convert currently selected meshes to foliage
Furthermore, the following applies:
- If a mesh is already found in the foliage type list, it will add the mesh to that foliage type.
- Override materials are only checked if the foliage type does not exist yet. If it already found a foliage type with the corresponding mesh, it will add it to this list, ignoring the potential override materials used on the mesh
- If a mesh is not found in the foliage type list yet, it will use the mesh and override materials of the first selected actor
Duplicate foliage to meshes
Converts foliage to static meshes, but does not remove the foliage. Only all foliage can be converted, not a specific type.
- Convert Foliage types
- Hit this button to start converting all foliage types to meshes.