Introduction
All features of EasySky are documented here. Feel free to join Discord if you have any questions or feature requests. You can also Email us at Perfect_StormTD( @ ) hotmail.com.
Before you start
If you want to place EasySky into your level, simply drag the BP_DayNightCycle into your level. Make sure you do the following things in order to make it work correct:
- Remove or reference all Directional Lights in your scene
- Remove or reference all Sky Lights in your scene
- Remove or reference all Exponential Height Fog actors in your scene
- Remove or reference all Post-Process Volumes in your scene
- Remove all other sky actors
- Remove all Atmospheric Fog actors
Overview of Categories
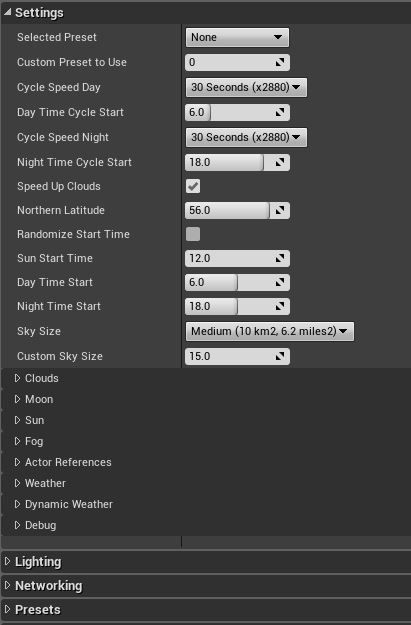
Overview of all the Categories and settings of EasySky:


Presets
Presets are very useful to quickly get a pre-defined look into your scene. But presets are also used for the dynamic blending of the skybox. EasySky will blend between presets in real time. In a multiplayer session, the server will be responsible for choosing the new parameters (preset, blending time, delay between presets, etc), and clients will follow this. Clients use a lot of client prediction to keep the amount of network traffic to a minimal.
These are the settings that influence presets:
- Selected Preset
- The preset to visualize in the editor. This will also be the starting state of the skybox when dynamic sky blending is enabled.
- Users can also define custom presets. To visualize these, set this property to Custom.
- Custom Preset to Use
- If the Selected Preset is set to Custom, then this will be the custom preset number that is visualized. The number can never be higher than the amount of custom presets the user created, else it will just take the last custom preset. If the user does not have any custom presets defined, it will ignore custom presets, and use the default preset (None).
Read more about how to change presets in the section Modifying Presets
Cycle Speed
The Cycle Speed determines the speed of the Day and Night Cycle. It’s split up in 4 properties:
- Cycle Speed Day
- Time it takes for the Day Cycle to complete
- Day Time Cycle Start
- Time in hours when the speed of the Day Time Cycle should start
- Cycle Speed Night
- Time it takes for the Night Cycle to complete
- Night Time Cycle Start
- Time in hours when the speed of the Night Time Cycle should start
By default, both properties are set to 3 minutes, meaning it will take 3 minutes to do a 24 hours cycle.
Users can change this to one of these settings:
- 1 second
- 10 seconds
- 30 seconds
- 1 minute
- 3 minutes
- 5 minutes
- 10 minutes
- 30 minutes
- 1 hour
- 3 hours
- 6 hours
- 12 hours
- 24 hours (Real Time)
Users have the option to exclude the clouds from the cycle speed up, by un-checking the Speed up Clouds checkbox.

Northern Latitude
- This property lets you tweak the Northern Latitude. This controls how the sun will progress over the level. A latitude of 0 means that at 12 o’clock, the sun will right above the level. A latitude of 90 or -90 means it will be on the horizon. Please keep in mind that the tilting of the earth is not taken into consideration, so it will always travel the same path.
- The calculation is an approximation of the Northern Latitude. It should not be used to do lighting visualizations for shadow models, but pure as a cosmetic feature!
Sun Start Time
- Controls the time on level start in hours. For example: 13 means 1 o’clock PM (13.00 hr), 1 means 1 o’clock AM (01:00 hr).
- Users can randomize the start time on start by checking the “Randomize Start Time” checkbox.
Sky Size
- This is useful to scale the skybox if desired. Users can choose from a couple of settings:
- Extra Small
- Small
- Medium
- Large
- Extra Large
- Custom
- If the user chooses the Custom setting, they can use the Custom Sky Size parameter to set the desired scale.

Clouds
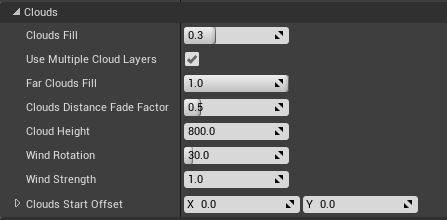
The Dynamic Clouds have lots of settings that can be tweaked. Here is a list of settings that will change the clouds:
- Clouds Fill
- This parameter will increase or decrease the amount of clouds. The parameter can be called by other blueprints and changed at run-time. Please note that in this version, editing it at run-time will not work in multiplayer.
- Far Clouds Fill
- Just like Clouds Fill, this will increase or decrease the amount of distance clouds. These clouds are barely visible, but add a lot of depth to the sky.
- Cloud Distance Fade Factor
- The power of fading the clouds in the background
- Cloud Height
- The height of the cloud layer.
Wind is used for the clouds. It controls the speed and direction of the clouds. The direction and speed are set at initialization, and at this moment, they can’t be changed during run-time.
- Wind Rotation
- Controls the wind direction.
- Wind Strength
- Controls the wind strength.
- Use Multiple Cloud Layers
- The user can disable the Far Clouds to save an extra texture lookup and gain some performance, by un-checking this checkbox.
- Clouds start offset
- Start offset of the clouds texture. Can be used to create nice screenshots or a nice starting position.
Lighting
Sky Light
The sky light controls the ambient lighting in the scene. The directional lights of the sun and moon control the main lighting, but the sky light is important, because it removes black shadows in the scene.
The plugin uses 2 cubemaps. One daytime and one nighttime cubemap. It will blend between them during the transition from day to night or the other way around. The cubemaps are pre-rendered, to make sure that there is no performance drop when entering night time or day time again.
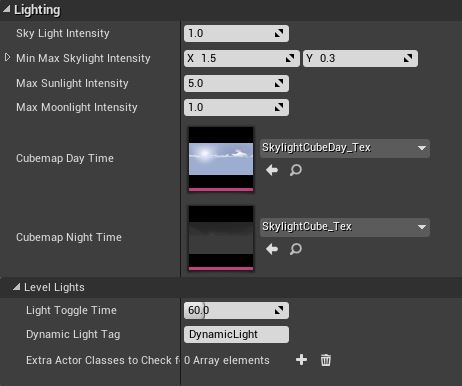
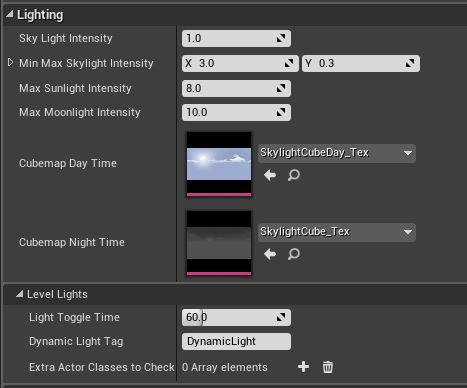
There are several parameters that can influence the ambient lighting of the SkyLight:
- SkyLight Intensity
- Controls the general intensity of the SkyLight
- MinMax SkyLight Intensity
- Min is a multiplier of the SkyLight Intensity during Night time
- This could brighten or darken the ambient lighting during Night.
- Min is a multiplier of the SkyLight Intensity during Night time
- Max is a multiplier of the SkyLight Intensity during day time
- This could brighten or darken the ambient lighting during the day.
- Max is a multiplier of the SkyLight Intensity during day time
- Max Sunlight Intensity
- The Sun’s Directional Light intensity.
- Max Moonlight Intensity
- The Moon’s Directional Light Intensity.
- CubemapDayTime
- The cubemap to use during day time.
- CubemapNightTime
- The cubemap to use during night time
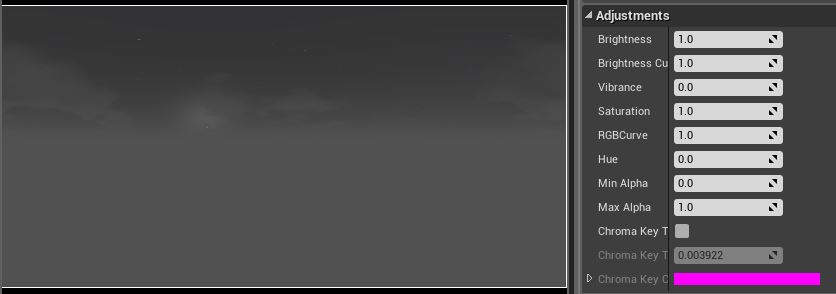
You can change the brightness of the Cubemaps in its properties. This will influence the ambient lighting in the scene during day or night.

Level Lights
EasySky allows users to define lights that should be toggled on and off during day/night transitions. These lights can either be stationary or movable. It’s even possible to include blueprint classes, so users can easily add asset blueprints that contain meshes and lights.
Lights that are placed in the level must be tagged with a specific tag used for light toggling. This tag can be set in the properties, and is by default “DynamicLight”.

Preview of level lights triggered during a night transition. The lantern is a blueprint with a stationary light included.
- Lights Toggle Time
- The time it takes in minutes to toggle all lights during a day/night transition. Lights are triggered in random order, but lights grouped by a blueprint will be triggered all at once.
- The order of toggle is equal for all clients and server, and is replicated.
- Dynamic Light Tag
- The tag to give lights that need to be toggled during transition.
- Extra classes to check for lighting
- Here the user can define blueprint classes that need to be toggled during day/night transition. Please note that these classes will only be checked during level load, so spawned actors will not be included (maybe in the future).
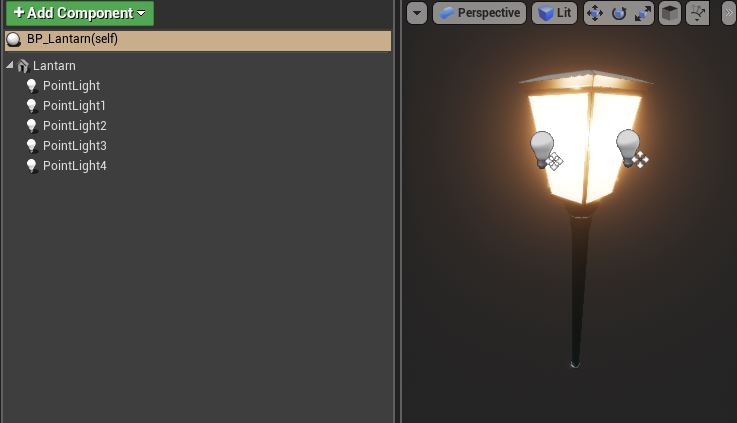
Lantern Blueprint used in the example: The blueprint contains 5 lights: 4 movable lights to light the side of the lantern, and 1 stationary light to light the environment. The blueprint class is added in the “Extra classes to check for lighting” section.
Moon
The moon plays a big part during the night. It creates lighting from its directional light, but also has a realistic moon phase.
At the moment, it’s not possible to change the moon texture through blueprint. This will be added in a later update, but can easily be achieved by replacing the moon texture by something else. Keep in mind that the moon uses a diffuse and normal map texture.
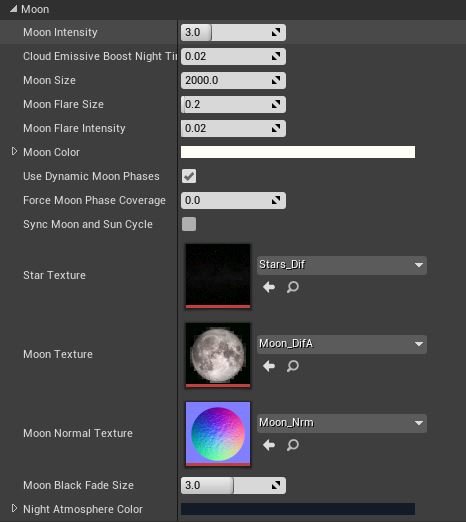
The parameters that control the moon are as follows:
- Moon Intensity
- The Intensity of the moon and flare.
- Cloud Emissive Boost Night Time
- This can adjust the brightness of the clouds during night time.
- Moon Size
- Controls the size of the moon.
- Moon Flare Size
- Controls the size of the flare around the moon
- Moon Flare Intensity
- The opacity of the glow around the moon.
- Moon Color
- The color of the moon
- Star Texture
- Controls the texture of the sky at night time
- Moon Texture
- The texture used for the Moon Visual
- Moon Normal Texture
- The Normal map texture used for the moon
- Moon Black Fade Size
- Controls the amount of black fade around the moon
- Night Atmosphere Color
- Controls the color of the sky during night time

Dynamic Moon Phases
- Use Dynamic Moon Phases
- By default, the moon phases will be respected, so the moon will cycle through all moon phases. Users can turn this off with this property.
- Force Moon Phase Coverage
- If Use Dynamic Moon Phases is disabled, this value will be used to force the use of a specific moon phase state. This value ranges from 0 to 1.
- Sync Moon and Sun Cycle
- Always sync the moon cycle with the moon cycle. This will make sure that user always see either the sun or the moon, but never 2 at the same time. This will be better for performance as only 1 directional light will be active at the same time.
Sun
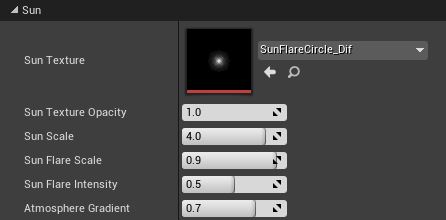
The sun can be tweaked by the following settings:
- Sun Texture
- The texture of the sun.
- Sun Texture Opacity
- The opacity of the sun.
- Sun Scale
- Controls the scale of the sun.
- Sun Flare Intensity
- Controls the intensity of the flare around the sun

- Ambient Gradient
- Controls the amount of gradient towards black in the sky, from the position of the sun. A value of 1 will blend the sky to completely black, a value of 0 will disable the gradient
Fog
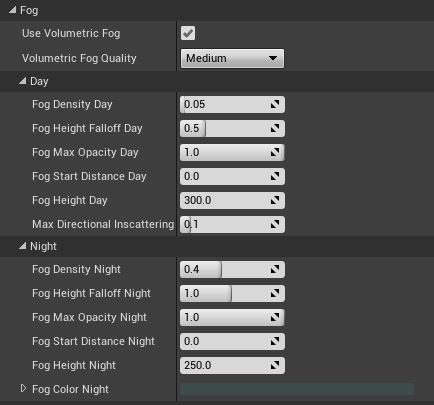
Fog is used to mask the clouds in the background, but also to enhance the atmosphere of the scene. The Blueprint comes with an exponential height fog, and some of the settings can be altered in the blueprint. Keep in mind that the size of the sky can change the outcome of the fog on the sky. A bigger sky will apply more fog on the clouds then a small skybox.
- Use Volumetric Fog
- Use volumetric fog. This is slightly more expensive than usual fog, but it will take the sun color and shadow casting into account when calculating the fog.
- Volumetric Fog Quality
- The quality of the volumetric fog. Only used if “Use Volumetric Fog” is enabled. A lower value will increase performance.
Requires simulate, play in editor, or editor reboot to be visible!
- The quality of the volumetric fog. Only used if “Use Volumetric Fog” is enabled. A lower value will increase performance.

- Fog Density
- Fog Height Falloff
- Fog Max Opacity
- Fog Start Distance
- Fog Height
- Fog Night Color
- Controls the color of the fog during Night time.
- Max Directional Inscattering Brightness
- Controls the brightness of the glow around the sun visible in the fog.
Weather
Rain
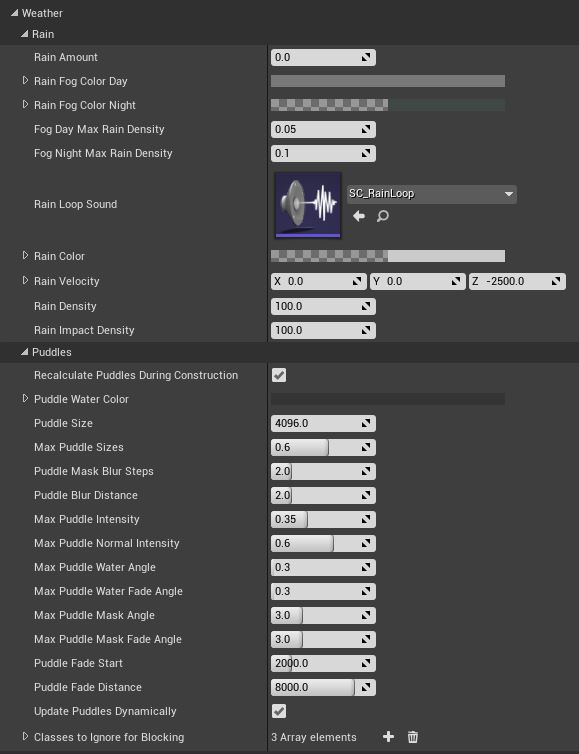
- Rain Amount
- The Amount of rain currently applied in the scene. 0 = no rain, 1 = heavy rain.
- Rain Fog Color Day
- The fog color of the rain during day time.
- Rain Fog Color Night
- The fog color of the rain during night time.
- Fog Day Max Rain Density
- The density of the fog during day time.
- Fog Night Max Rain Density
- The density of the fog during night time.
- Rain Loop Sound
- The rain sound to play when raining.
- Rain Color
- Color of the rain particlers.
- Rain Velocity
- Speed of the rain.
- Rain Density
- Density of the rain.
- Rain Impact Density
- Density of the splash effect on the ground.
Puddles
Setup
Puddles are automatically generated when rain starts to fall. They respect the angle of the terrain and will form puddles where terrain is flat.
In order to receive puddles in your material, you will need to add the Puddles_Func function to your material.
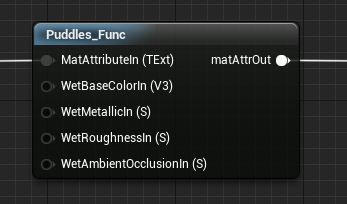
The puddles function has a couple of inputs and 1 output.
Inputs:
- MatAttributeIn
- The material attribute to be used as input for the puddles. This is basically your terrain material.
- If you don’t work with material attributes, you can easily create one by adding the Make Material Attributes node, like so:
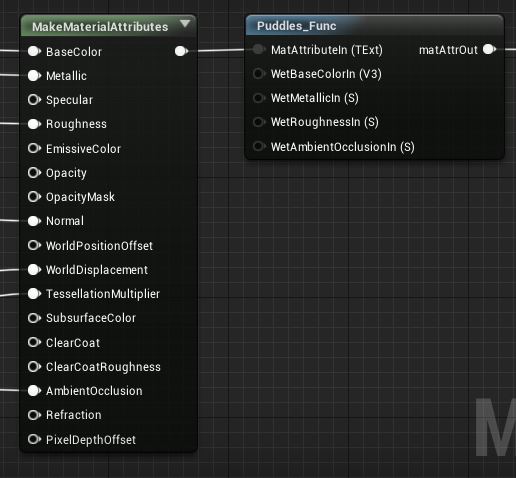
- WetBaseColorIn
- Optional: The base color to be used where puddles should be shown. By default, this is the base color from your material attribute input, multiplied by 0.7 to darken it a bit.
- WetMetallicIn
- Optional: The metallic value to be used where puddles should be shown. By default, this is set to 0
- WetRoughnessIn
- Optional: The base color to be used where puddles should be shown. By default, this is based upon the material attribute input.
- WetAmbientOcclusionIn
- Optional: The ambient occlusion to be used where puddles should be shown. By default, this is set to the material attribute input ambient occlusion.
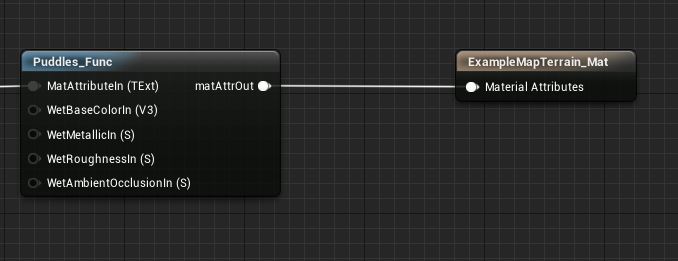
Outputs:
- MatAttrOut
- This should be hooked up to your material attributes. This is the final material.
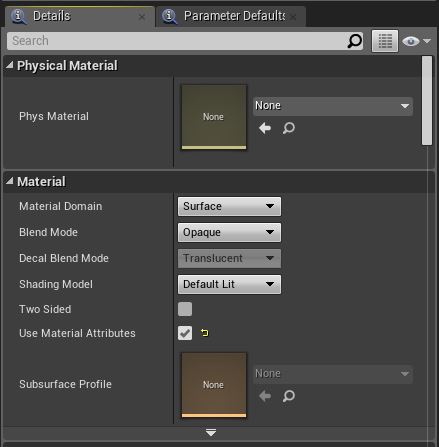
Please note: If you don’t see the material attributes at all, then you need to enable it in your material. Go to your material properties in the detail panel and enable the “Use Material Attributes” flag.
Parameters
Occlusion from geometry is only visible during play!
In most examples, the puddle water color has been set to very bright blue to visualize the effect.
- Recalculate Puddles During Construction
- A checkbox to enable or disable puddle preview in the editor. Disabling this can greatly improve performance in the editor on low spec machines.
- Puddle Water Color
- The water color of the rain puddles.
- Puddle Size
- The size of the puddles.
- Max Puddle Sizes
- Puddles are growing overtime. This value indicates their maximum growth. 0 means no growth (always invisible), 1 means full growth.
- Puddle Mask Blur Steps
- The amount of times to blur the generated puddle mask texture. This removes sharp edges from the mask texture. Depending on the Puddle Blur Distance.
Only visible during play!
- The amount of times to blur the generated puddle mask texture. This removes sharp edges from the mask texture. Depending on the Puddle Blur Distance.
- Puddle Blur Distance
- The distance in pixels used when blurring the puddle mask texture. Bigger distances will blur the texture more.
Only visible during play!
- The distance in pixels used when blurring the puddle mask texture. Bigger distances will blur the texture more.
- Max Puddle Intensity
- The maximum intensity of the puddles
- Max Puddle Normal Intensity
- The maximum normal intensity of the puddles. 1 means a normal of 0,0,1. 0 means that the normal information of the background layer is shown.
- Max Puddle Water Angle
- The maximum angle where puddles can be filled with water. This will also deform the normals so the puddles look flat.
- Max Puddle Water Fade Angle
- The amount of fade to apply to the water angle
- Max Puddle Mask Angle
- The maximum terrain angle of where puddles can form.
- Max Puddle Mask Fade Angle
- The amount of fade to apply to the puddles where the terrain exceeds the max puddle mask angle.
- Puddle Fade Start
- Start distance where puddle fadeout starts
- Puddle Fade Distance
- Fade distance, measured from the Puddle Fade Start, of the puddles.
- Update Puddles Dynamically
- Update puddle occlusion from geometry every 5 meters. Disabling this will calculate occlusion from geometry on begin play only. However, this does not work well for big levels because the puddle occlusion texture has a fixed resolution, so keep this turned on for bigger levels!
- Classes To Ignore for Blocking
- Classes to be ignored when fetching actors that should block the rain. Dynamic actors should be included here, such as the player characters.
Dynamic Weather
- UseDynamicWeather
- When enabled, the system will blend between different weather presets. Calculations are done on the server and replicated to all clients.
- MinMaxPresetChangeDelay
- The minimum and maximum delay time between preset blendings, in minutes.
Modifying Presets
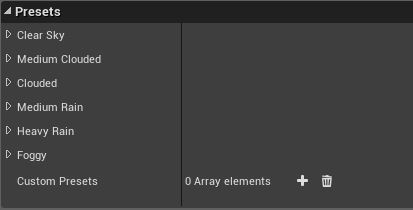
Presets can be found under the tab Presets. There are a couple of pre-defined presets, and a slot for Custom Presets. Every preset contains several parameters for a specific weather type. Most of the properties are duplicates of the general properties, that are specific for this preset. (For example CloudsFill). They have the same behavior as the general properties.
Below the list of exclusive properties that can be changed per preset.
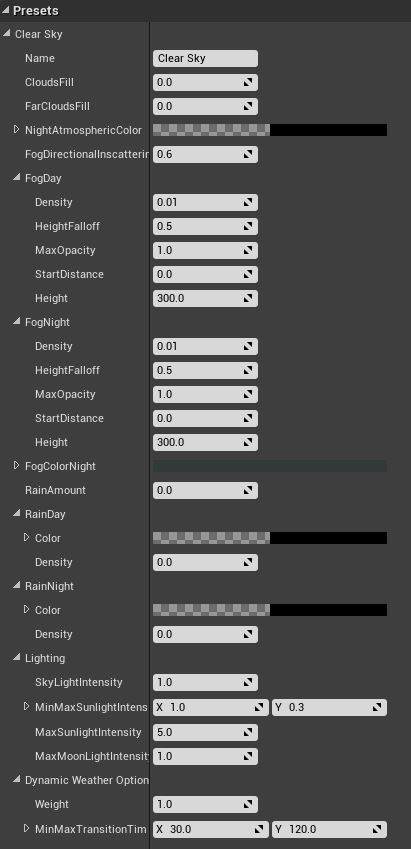
- Name
- The name of the preset. Used for clarity to the user and debug logging.
- Dynamic Weather Options
- Weight
- The chance that this preset will be chosen when it randomly picks a preset. All weights will be added by the system, and a random value will be picked. For example: If you have a preset with weight 1 and a preset with weight 2, then preset 2 has twice the chance of getting picked during the random pick.
- Set the weight to 0 or less to disable this preset from being picked.
- MinMaxTransitionTime
- The minimum and maximum time it will take to blend to this preset, in minutes. The system will pick a random value between these values.
- Weight
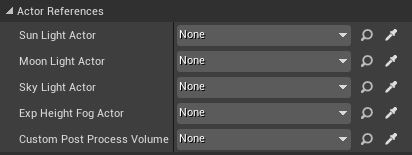
Actor References
Actor references are useful if you already have actors in your level that you want to configure for the Skybox to be used, in stead of the integrated components within the blueprint. It’s much cleaner in the outliner and easier to tweak the settings, since you can just select the actors in the world outliner, rather than selecting the components in the blueprint.
All these references are optionally though.
- Sun Light Actor
- The Directional light that should be used as the main Sunlight.
- This light must have its mobility setting set to Movable
- The checkbox “Atmosphere Sun Light” must be enabled for this light, in order to make the fog work correct.
- The Directional light that should be used as the main Sunlight.
- Moon Light Actor
- The Directional Light used for the Moonlight.
- This light must have its mobility setting set to Movable
- The Directional Light used for the Moonlight.
- Sky Light Actor
- This can reference a Sky Light Actor from your scene.
- The Sky Light’s mobility setting must be set to Movable
- The Sky capture source (Source Target) must be set to “Use specific Cubemap”
- This can reference a Sky Light Actor from your scene.
- Exp Height Fog Actor
- The fog actor that should be referenced
- Custom Post-Process Volume
- Reference a post-process volume and use these settings.
- If this is not filled in (None), it will use it’s pre-defined post-process settings.
Networking
During a multiplayer session, the clients will constantly sync up with the server in order to make sure EasySky is synced.
However, this in only done every X seconds to save bandwidth. The client will request the current time, and smoothly blend to that time locally. It will do this based on the Network Sync Interval value. The default is set to 3, which means that EasySky will sync up every 3 seconds.
Network syncing logs can be enabled in the Debug section (see below). Set the debug log type to Networking to see information about network timing.

Debug
Its possible to do some debugging in EasySky as well. It has a build in debug features that shows you different type of debug messages. In order to get debug information, select the type of debug you want to see in the debug Type field.
Sky and Sun Colors
Although not exposed in the blueprint details panel, users are able to change the colors of the sky and light.
In order to do this, you’d have to edit the SkyColorCurve for the Sky Colors, and the SunColorCurve for the Sun Color. They can be found in DayNightCycle/Blueprints/
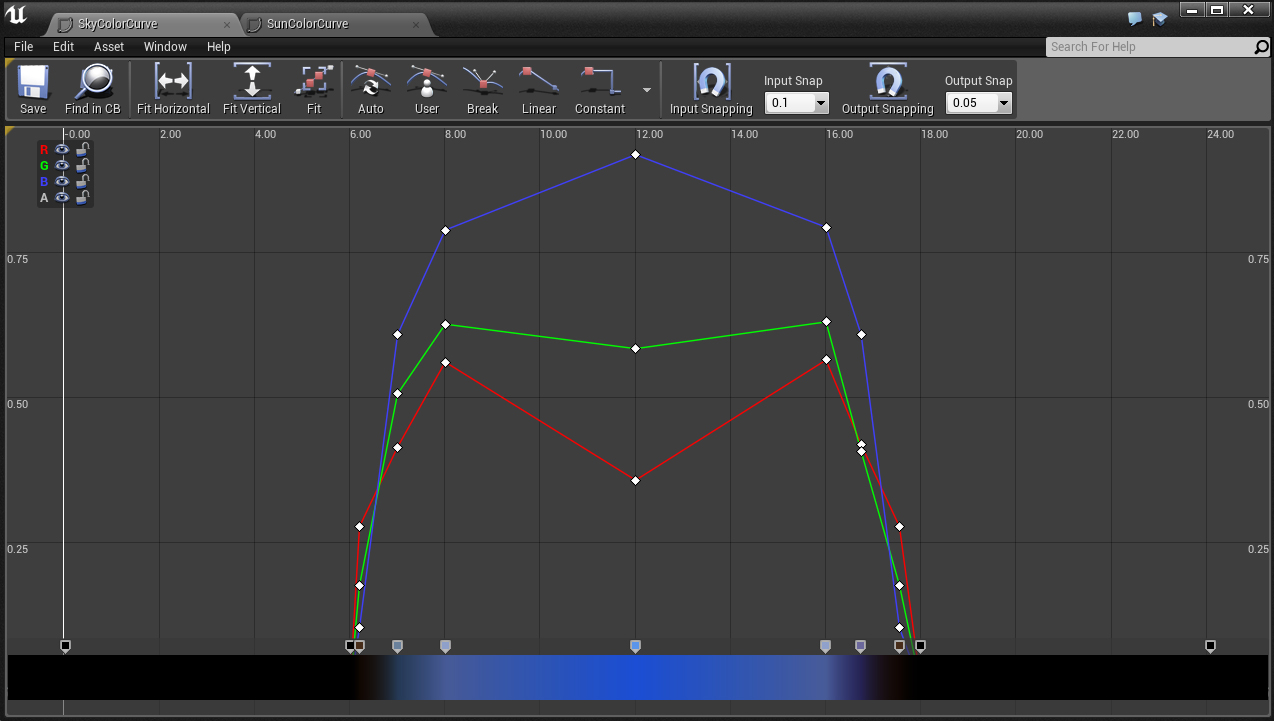
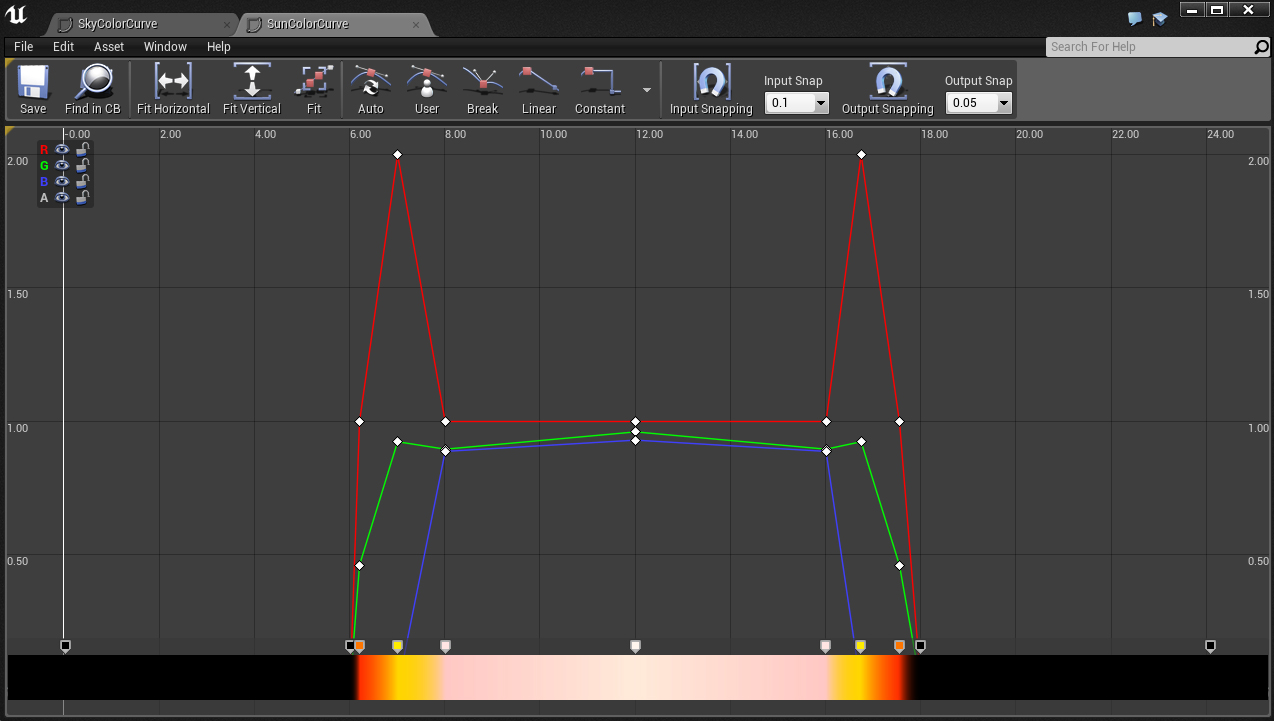
Please note that the colors won’t be updated right away in your viewport. You will first need to refresh the EasySky Blueprint by changing any property in the details channel, or by playing or simulating the game.
Audio
EasySky also comes with a blueprint actor that can contain 2 sounds:
- Day Sound
- Night Sound
This actor can be used to trigger different types of sounds in your level. It’s very easy to use. All you have to do is to put one in the level, and change the day and night sounds to your liking.
In the ExampleMap you can find some examples of this actor.
Parameters

- Day Sound
- The sound to be played during day time (Day time start can be set in the Sky Blueprint)
- Night Sound
- The sound to be played during the night (Night time start can be set in the Sky Blueprint)
- Audio Blend Time
- The time to blend between the Day sound and the Night sound, in seconds. This is not taking the simulation speed into account, and should be seen as real time seconds.